

You can set individual margins and padding independently for top, bottom, left and right. You can set all of these values independently for large (desktop), medium (tablet), and small (phone) devices.
When you add a custom margin or padding setting to an individual row, column, or module, this setting is automatically used for medium devices as well, unless you specifically add a different setting for medium devices. For example, if you set a top margin on a row to 100 px, tablets will also display a top margin of 100px.
NOTE
Content modules only have margin settings, not padding settings.
How the value gets set for mobile devices depends on whether global c is enabled (default state) or not. For an explanation of how auto spacing works, see the article on troubleshooting spacing on mobile devices. Without auto spacing, the small device setting inherits the medium device setting, which inherits the large device setting, unless you assign a custom setting.
To set margins and padding for an individual row, column, or module:
- Open a row, column, or module for editing by clicking the wrench icon.
- Click the Advanced tab.
The Margins and Padding fields are shown in the following screenshot. The device size icon, circled in orange, shows that this is the large-device setting.
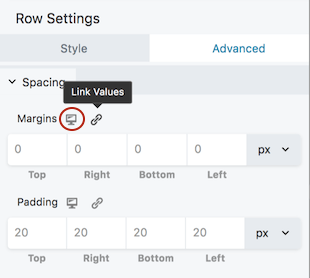
- Change the margin values as you like.
You can toggle the Link values icon to synch all four values. When it’s enabled (the icon color changes to blue), then when you can add or change a value in the first field, the other three fields are automatically given the same value. - For rows and columns only, change the padding values as you like.
The device size and Link values icons work the same way as for margins. Settings for large devices propagate to smaller device sizes unless you set specific values for them. - (Optional) Click the device icon next to each field to toggle the preview from desktop (large) to tablet (medium) to mobile (small). Check the settings for each device size and add custom values if you want. See the screenshot below that shows the device icon.
- Click Save when you’re done editing.